


Why I Did This (a.k.a. The Annoyance Factor)
At home, I’ve been running AdGuard Home on a Debian box, and honestly, it spoils you. Once you get used to a clean internet, going back to the raw, ad-soaked version almost feels like being teleported back to the early days of the web.
Suddenly it’s 2002 again: sketchy sites promising free Photoshop but secretly installing ten toolbars, casino banners spinning endlessly, Geocities pages with autoplay MIDI files, and popups congratulating me for being the millionth visitor.
And if you’re really unlucky, you get redirected to pages full of Nigerian princes offering fortunes and Princess Peach trying to have an affair behind Mario’s back. It’s like the Avengers of terrible internet tropes have assembled just to haunt me.

Ok, maybe I’m exaggerating a bit. But you get the point — scrolling down half a page of Google just to find the actual results instead of ads, or sitting through unskippable commercials when streaming news clips on sites like VG.no or any other news site.
My Home Setup
To keep my sanity, I’ve been running AdGuard Home on a Debian box at home. It works as a DNS sinkhole, quietly filtering out ads and trackers before they ever reach my devices.
When I’m away, I’ve been using a WireGuard VPN connection back home, which points all my DNS traffic through AdGuard. It’s simple, secure, and for the most part — effective.
The only catch? It’s a hassle. Every time I need to access something else, like my work network, I have to disconnect from the VPN, do my thing, then reconnect later. My poor VPN toggle button has gotten more workouts than I have.
From Home to the Cloud
The last few weeks we’ve been working on Cloud Security in my studies, and naturally, Azure has been the main playground. That’s why I decided to go with Azure for this project. Sure, providers like Hetzner or Linode could have been cheaper 💸, but part of this exercise was to force myself to interact with Azure as much as possible.
Even after finishing the Cloud Security module, I want to keep pushing myself to find projects I can build in Azure. It’s not always the most cost-effective option, but it’s a great way to stay hands-on and reinforce what I’ve learned.
Another advantage is Azure’s global footprint. Since I enjoy traveling in Southeast Asia, the idea of being able to spin up a VM in another region if needed felt like a nice perk. Not exactly mission-critical, but the flexibility is fun to play with.
The Setup (Short Version)
So here’s what I ended up building:
- A small VM in Azure, running AdGuard Home.
- SSL certificates handled by lego with the Namecheap DNS API. A daily systemd timer renews the cert when it’s within 30 days of expiry, and restarts AdGuard Home automatically. No manual cert babysitting needed.
- Encrypted DNS only: DoH (DNS over HTTPS) and DoT (DNS over TLS). Plain DNS? Disabled, gone.
- Traffic rules managed with an NSG (Network Security Group) tied to an ASG (Application Security Group) for the VM. Only secure DNS is allowed; everything else gets dropped.
- Looked at Azure’s fancy Just-In-Time (JIT) access, but since I’m cheap, I rolled my own “Temu JIT™” — firewall rules locked down to only my home’s static IP.
The end result: a cloud-hosted DNS sinkhole that I can point my devices to wherever I am, without juggling VPN switches all day. It’s secure, lean, and doubles as my ongoing Azure practice lab.
Step-by-Step Guide
Here’s the practical setup for running AdGuard Home on Azure, with SSL, automated renewals, and locked-down firewall rules.
1. Prerequisites & Preparations
- A domain (or subdomain) you control, with DNS API access (e.g. Namecheap).
- An Azure subscription.
- SSH key for VM access.
- Basic Linux/Azure portal knowledge.
- NSG/ASG setup in Azure, Key Vault permissions if you want to store certs there.(Optional)
2. Launch & Prepare the VM
- In Azure, create a VM (Debian or Ubuntu works well).
- Place it in a subnet protected by an NSG (Network Security Group).
- (Optional, but nice): create an Azure Key Vault to store your SSH key, instead of just leaving it in your Downloads folder.
- Associate the NSG rules to an ASG (Application Security Group) where your VM lives, so you can manage allowed traffic more granularly.
- Make sure SSH works. Keep ports closed except what you need: initially SSH (22), plus 3000 for the first AdGuard setup, and pre-open 443/853 for DNS. Later, unused ports can be blocked.
3. Install AdGuard Home
Update packages, install dependencies, then pull down the install script:
sudo apt update
sudo apt install curl dnsutils -y
curl -s -S -L https://raw.githubusercontent.com/AdguardTeam/AdGuardHome/master/scripts/install.sh | sh -s -- -v
Then follow the initial web setup: http://your-adguard-server:3000
Create an admin user, pick a network interface, and confirm it’s running.
4. Point Your Domain / DNS
- Add an A record in your DNS provider pointing adguard.yourdomain.com (or a wildcard) to your VM’s public IP.
- Wait for DNS propagation.
5. Obtain TLS / SSL Certificates (LEGO + DNS API)
- Install lego.
mkdir /opt/lego
cd /opt/lego
curl -s "https://raw.githubusercontent.com/ameshkov/legoagh/master/lego.sh" --output lego.sh
chmod +x lego.sh- Export your DNS API credentials (e.g. Namecheap). For other providers, check this guide: https://go-acme.github.io/lego/dns/
- Run lego with the DNS challenge to issue a certificate.
NAMECHEAP_API_USER=your-username\
NAMECHEAP_API_KEY=your-key \
lego --email you@example.com --dns namecheap -d '*.example.com' -d example.com run- Verify cert & key files are created in your lego directory (e.g. ~/.lego/certificates).
6. Automate Renewals
- Create a script (renew-adguard-cert.sh) that:
- Exports your DNS API creds
- Runs lego renew –days 30
- Restarts AdGuard Home
#!/bin/bash
export NAMECHEAP_API_USER="your_namecheap_username"
export NAMECHEAP_API_KEY="your_namecheap_api_key"
/usr/bin/lego \
  --email="you@your-domain.com" \
  --dns namecheap \
  --domains="_.your-domain.com" \
  --path="/home/your-user/.lego" \
  renew --days 30
sudo systemctl restart AdGuardHome
#Make the script executable:
chmod +x /home/your-user/scripts/renew-adguard-cert.sh- Add a systemd service + timer (preferred over cron) to run the script daily.
#Create the service
sudo nano /etc/systemd/system/lego-renew.service
[Unit]
Description=Renew Let's Encrypt certificate with lego and restart AdGuard Home
After=network-online.target
Wants=network-online.target
[Service]
Type=oneshot
User=your-user
ExecStart=/home/your-user/scripts/renew-adguard-cert.sh
#----------------------------------------------------------------------------------
#Create the timer
sudo nano /etc/systemd/system/lego-renew.timer
[Unit]
Description=Run lego certificate renewal daily
[Timer]
OnCalendar=daily
Persistent=true
[Install]
WantedBy=timers.target
#Enable and start
sudo systemctl daemon-reload
sudo systemctl enable --now lego-renew.timer
#Check
systemctl list-timers lego-renew.timer
#----------------------------------------------------------------------------------
Testing
#Run manually:
sudo systemctl start lego-renew.service
#Check logs:
journalctl -u lego-renew.service -n 20
#You should see:
[_.you@your-domain] The certificate expires in XX days, ... no renewal.
#Check expiry:
openssl x509 -in /home/your-user/.lego/certificates/_.your-domain.crt -noout -enddate
- Certificates are now hands-free: they renew automatically and AdGuard restarts to pick them up.
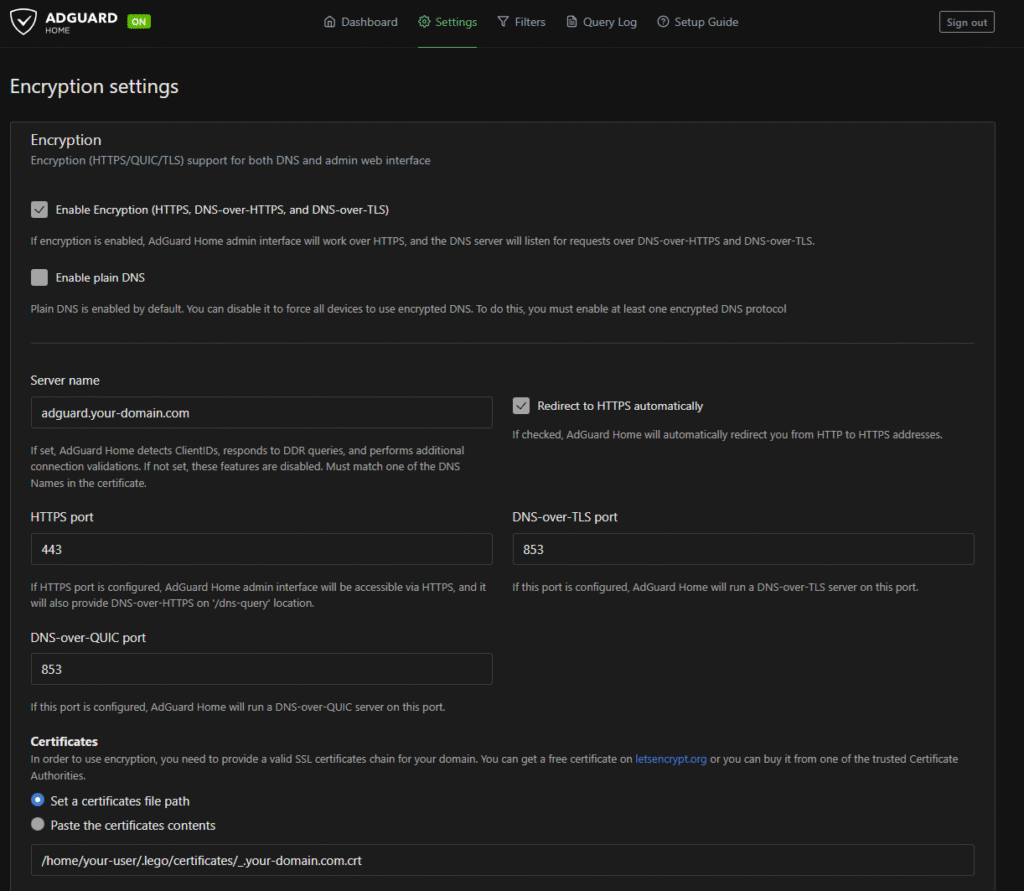
8. Configure AdGuard Home for Encrypted DNS
- In AdGuard Home, go to Settings > Encryption Settings.
- Point it to your cert & key (from lego).
- Enable DoH (DNS-over-HTTPS) and DoT (DNS-over-TLS).
- Disable plain DNS (port 53) unless you need it for legacy devices. (I kept plain DNS on my home instance, but disabled it in Azure since all my devices on the road support encrypted DNS.)
9. Harden Networking (NSG / ASG / Firewall Rules)
- In your NSG, allow inbound only on 443 (DoH) and 853 (DoT).
- Drop everything else.
- Associate rules with your VM via ASG for tighter scoping.
- Bind the management portal to a port only accessible from within the virtual network.
- (Optional) Use Azure JIT access — or my budget-friendly “Temu JIT™” approach: allow SSH only from your home IP.
(If it’s static, otherwise you will have to update it every time it changes)
10. Test & Verify
- Open the AdGuard Home dashboard — confirm encrypted DNS works.
- On a client (phone/other network), set DNS to adguard.yourdomain.com via DoH/DoT, check that ads are blocked.
If everything works, congrats 🎉 — you now have your very own cloud-hosted DNS sinkhole, and the popups, princes, and wayward princesses will have to haunt someone else’s connection.
11. If this is too much
- Check this article by AdGuard on how to host it in your home network:
https://adguard-dns.io/kb/adguard-home/getting-started/
Leave a Reply